Deploying Meadow.OS
When you receive your Meadow board, it will need to have the latest Meadow.OS uploaded, or flashed, to it.
NOTE: Communicating with the Meadow board for updates and deployments requires a quality USB cable with data lines. Some USB charging cables only have power lines connected internally or have poor construction that may not properly support communication. Power-only cables will not work for communicating with a device. And poorly constructed cables may fail during various updating and deploying attempts. Make sure to find a quality USB cable with data lines if your Meadow device is not recognized or communication errors occur.
Additionally, if you have your Meadow device connected through a USB hub without a dedicated power supply, it may not provide enough power to the device. In this case, connect the Meadow device directly to your computer.
- Windows
- macOS
- Linux
Step 1 - Create a Wilderness Labs Account
In order to download the latest version of Meadow.OS, you will need to register for a Wilderness Labs Account.
Step 2 - Install .NET SDK
Download and install version 8 .NET SDK.
Step 3 - Install Meadow.CLI
The way we flash Meadow boards (among other things) is via our command-line-interface tool called Meadow.CLI. Make sure you have it installed to continue.
Step 4 - Install dfu-util
From a console with admin rights, execute following command:
meadow dfu install
Step 5 - Put the device into DFU Bootloader mode
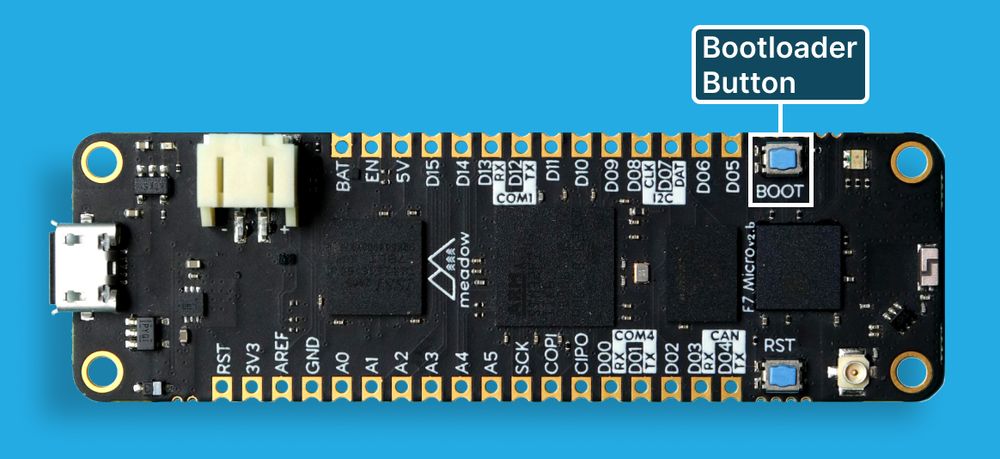
To flash your board with the latest OS, Meadow must be in DFU bootloader mode. To enter this mode, the BOOT button needs to be held down while the board boots up. This can be accomplished one of two ways.
If the board is disconnected: hold the
BOOTbutton down and connect the board to your computer via a Micro USB Cable.If the board is connected: hold the
BOOTbutton down, and then press and release theRST(Reset) button. Then release theBOOTbutton.

Step 6 - Install Meadow USB drivers
Checking Meadow USB drivers
Before flashing a Meadow board, open the Device Manager and check:
When the board is in Bootloader mode it should show up as a
STM32 BOOTLOADERdevice underUniversal Serial Bus Devicessection.When the board is connected normally it should show up as a
USB Serial Device (COMX)under thePorts (COM & LPT)section
If the board is in this state you can head over to the next step.
Updating Meadow USB drivers
If Meadow shows as Meadow F7 Micro (COMX) in regular mode, right-click on it and select Uninstall Device, and make sure to select Attempt to remove the driver for this device like so:
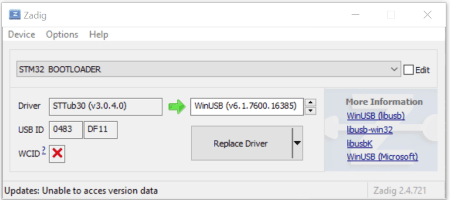
Now to flash Meadow OS, dfu-util is recommended. However, the default Windows USB driver for ST devices is not compatible with dfu-util, so it needs to be replaced. For more in-depth information on this, check out Scott Hanselman's post. Follow these steps:
Download and run Zadig
Connect the Meadow device holding the BOOT button pressed to power it on in Bootloader mode.
In Zadig, click Options > List All Devices
Select STM32 BOOTLOADER in the dropdown
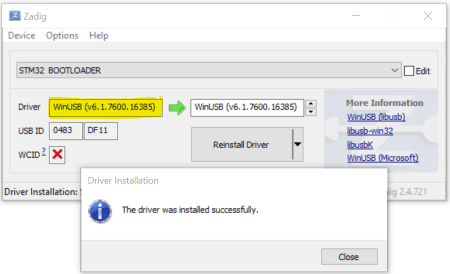
Click Replace Driver

After the installation is complete, driver should be WinUSB

Your board is now ready to flash it with latest Meadow.OS version.
Step 7 - Log in to your Wilderness Labs account
Use the following command to log into your Wilderness Labs Account:
meadow login
This will open a web browser where you'll need to enter your account credentials. If successful, you'll receive a confirmation on the CLI.
Step 8 - Download Meadow.OS
Now we can download the latest Meadow.OS binary files with the command:
meadow firmware download
Step 9 - Flash Meadow.OS
Once connected the Meadow device via the USB cable and having put the device into DFU Bootloader mode, execute the following command in your console:
meadow firmware write
When the flashing process has completed with no errors, disconnect and reconnect the Meadow board to give it a full restart.
Your board is now ready to have a Meadow application deployed to it!
Step 1 - Create a Wilderness Labs Account
In order to download the latest version of Meadow.OS, you will need to register for a Wilderness Labs Account.
Step 2 - Install .NET SDK
Download and install version 8 .NET SDK for your Mac's processor architecture.
Step 3 - Install or update Meadow CLI
To install Meadow CLI as a .NET tool, execute the following command in your terminal:
dotnet tool install WildernessLabs.Meadow.CLI --global
To update Meadow CLI, if already installed, execute the following command in your terminal:
dotnet tool update WildernessLabs.Meadow.CLI --global
Step 4 - Install dfu-util
To install dfu-util, we'll be using Homebrew. If you don't have it yet, install Homebrew first.
Execute the following command in your terminal:
brew install dfu-util
Step 5 - Download Meadow OS and network binaries
Execute the following command in your terminal:
meadow firmware download
NOTE: If the meadow command returns an error: command not found:
If your terminal cannot find the meadow command, it means the .NET SDK didn't add the global tool installation location to your shell's PATH variable. Run the following command to add that location to your PATH variable so your terminal knows where to find the meadow command. Then run the OS download command from above one more time.
export PATH="$PATH:$HOME/.dotnet/tools"
Step 6 - Put the device into DFU Bootloader mode
To update the OS, Meadow must be in DFU bootloader mode. To enter this mode, the BOOT button needs to be held down while the board boots up. This can be accomplished one of two ways.
If the board is disconnected: hold the BOOT button down and connect the board to your computer via a Micro USB Cable.
If the board is connected: hold the BOOT button down, and then press and release the RST (Reset) button. Then release the BOOT button.

NOTE: On macOS Sonoma and newer, you may need to allow USB device access for both regular Meadow mode and bootloader mode. If you release the
BOOTbutton before allowing the USB access in bootloader mode, your device may not be available for writing the firmware. Repeat the above process after alowing for USB access to get into bootloader mode again.
Step 7 - Flash Meadow.OS and Coprocessor Firmware
Now you have two options, please try the option 1 first:
Option 1 (from bootloader mode)
Once connected the Meadow device via the USB cable and having put the device into DFU Bootloader mode, execute the following command in your terminal:
meadow firmware write
Option 2 (from normal mode)
This following will only work if you have a newer version of Meadow OS installed. It is recommended to try option 1 first. Reset the device (push the RST button or disconnect and reconnect) and identify the serial port name that the Meadow is connecting on.
Execute the following Meadow CLI command in your terminal to determine the port your Meadow device is using.
meadow port list
On macOS, you should see a port like /dev/tty.usbmodem336F336D30361.
Once you've identified the port name, run the following command in your console, replacing {port} with the serial port name to send all future meadow commands to that device.
meadow config route {port}
NOTE: If the process hangs on Opening port '{PORT}'..., hit the RST button on the device.
Unplug and replug Meadow to give it a full restart. Your board is now ready to have a Meadow application deployed to it!
Please note: Linux may require sudo to access USB devices.
Step 1 - Create a Wilderness Labs Account
In order to download the latest version of Meadow.OS, you will need to register for a Wilderness Labs Account.
Step 2 - Install .NET SDK
Download and install version 8 .NET SDK.
Step 3 - Install or update Meadow CLI
To install Meadow CLI, execute the following command in your terminal:
dotnet tool install WildernessLabs.Meadow.CLI --global
To update Meadow CLI, if already installed, execute the following command in your terminal:
dotnet tool update WildernessLabs.Meadow.CLI --global
Step 4 - Install dfu-util
Execute the following command in your terminal:
sudo apt-get install dfu-util
Step 5 - Install libusb
Execute the following command in your terminal:
sudo apt-get install libusb-1.0-0-dev
Step 6 - Download Meadow OS and network binaries
Execute the following command in your terminal:
meadow firmware download
Step 7 - Put the device into DFU Bootloader mode
To update the OS, Meadow must be in DFU bootloader mode. To enter this mode, the BOOT button needs to be held down while the board boots up. This can be accomplished one of two ways.
If the board is disconnected: hold the BOOT button down and connect the board to your computer via a Micro USB Cable.
If the board is connected: hold the BOOT button down, and then press and release the RST (Reset) button. Then release the BOOT button.

Step 8 - Enable access to the device
To be able to access the device a udev rule needs to be added.
- Go to the folder
/etc/udev/rules.d - Create the file
50-meadow.rules - Add the following to the file:
SUBSYSTEM=="usb", ATTR{idProduct}=="df11", ATTR{idVendor}=="0483", MODE="0666", GROUP="user", TAG+="uaccess"
To verify the Product ID and Vendor ID execute the following command in your terminal:
lsusb
You should be able to find a entry similar to the following:
Bus 001 Device 009: ID 0483:df11 STMicroelectronics STM Device in DFU Mode
The format for the IDs is idVendor:idProduct. Please note that you need to disconnect and reconnect the Meadow to make the rules take affect.
Step 9 - Flash Meadow.OS and Coprocessor Firmware
Now you have two options, please try the option 1 first:
Option 1 (from bootloader mode)
Once connected the Meadow device via the USB cable and having put the device into DFU Bootloader mode, execute the following command in your terminal:
meadow firmware write
Option 2 (from normal mode)
This following will only work if you have a newer version of Meadow OS installed. It is recommended to try option 1 first. Reset the device (push the RST button or disconnect and reconnect) and identify the serial port name that the Meadow is connecting on.
To get access to the port your user needs to be added to the group dialout.
This is done with the command:
sudo adduser {your_user} dialout
Replace {your_user} with the user name. You need to logout and login again to make the changes affect.
To find the Port where the Meadow is connected execute the following command in your terminal:
ls -l /dev
look for
ttyAMC0
or similar. The port might change between reboots of the Meadow so make sure to check it after a reboot. If you can't detect which port the meadow belongs to run the command once with the Meadow disconnected and once with the Meadow connected to spot the difference.
Once you've identified the port name, run the following command in your console replacing [PORT] with the serial port name:
meadow config route [PORT]
NOTE: If the process hangs on Opening port '[PORT]'..., hit the RST button on the device.
Unplug and replug Meadow to give it a full restart. Your board is now ready to have a Meadow application deployed to it!